
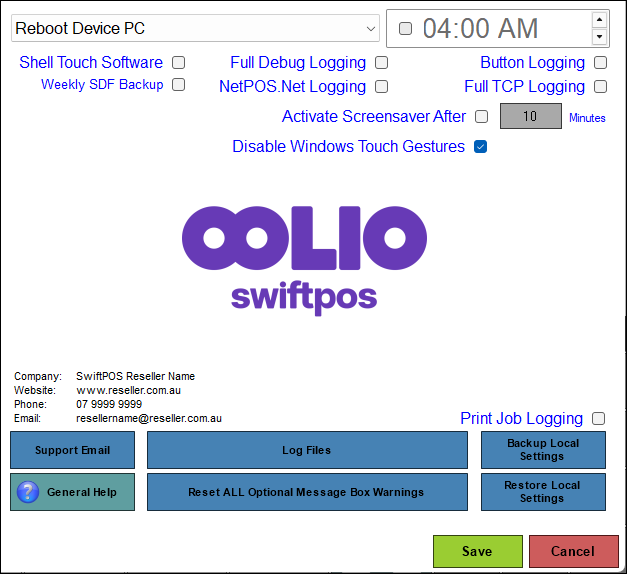
To access, select the About menu option in Terminal Settings. Used to view reseller contact information, provide access to configure Touch POS, access to help and support information, as well as access to various Tools.
Sections ▲ ▼
Header Section ▲ ▼
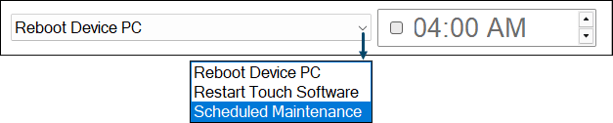
- Reboot Device PC - Select from the drop-down list one of the following:
- Reboot Device PC - Select to reboot the Touch POS device at the set time each day. The checkbox to the left of the time must be checked in order for this feature to be enabled.
Notes ...
If this feature is enabled then, it is recommended that the Restart Device option is NOT enabled as well. Both restart features should NOT be enabled together, as this can result in duplicate Terminal Cash Offs. By default, this option is enabled. It is good practice to have the device restart each day during a period where the Touch POS device is not in use as this will automatically delete old transaction information and compact the Touch POS database to provide the best performance possible on slow hardware. Also, it is recommended that when in Training Mode ensure this feature is disabled.
- Reboot Terminal PC continued ...
- Restart Touch Software - Select to only restart Touch POS at the set time each day, without rebooting the Touch POS device.
Notes ...
This will only happen if the check box to the left of the time is checked.
- Reboot Terminal PC continued ...
- Scheduled Maintenance - Select to run the maintenance processes normally associated with a scheduled Touch POS restart or terminal reboot, without restarting Touch POS or Windows. The maintenance processes identified are:
- Clear peripheral activation overrides
- Reload KVS records after clearing activation overrides
- Clear ad-hoc printer mappings
- Start POS Settings backup in silent mode
- Complete automatic backup to server
- Complete backup to server
- Remove offline members
- Clear old sales headers
When selected the Scheduled Maintenance option should complete these processes without:
- Restarting Touch
- Rebooting Windows
- Scheduled Maintenance - Select to run the maintenance processes normally associated with a scheduled Touch POS restart or terminal reboot, without restarting Touch POS or Windows. The maintenance processes identified are:
Notes ...
Available in Swiftpos v10.79.13, v10.80 and v10.81+. This is particularly useful for VMOTS and other environments that operate continuously, where restarting Touch POS or Windows solely to perform routine backup and maintenance tasks can be disruptive.
Middle Section ▲ ▼
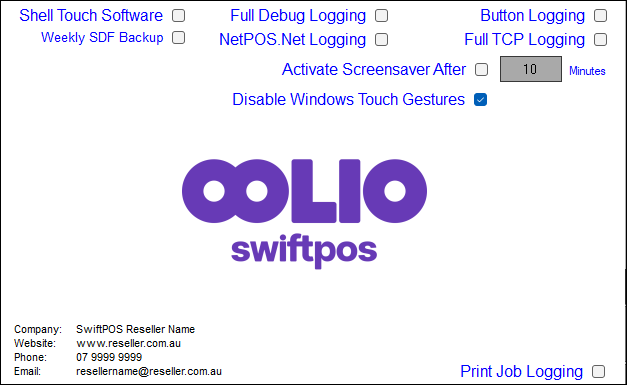
- Shell Touch Software - Select to ensure that the current Clerk/Staff Member is restricted to the Touch POS and Reception applications only.
IMPORTANT
Before selecting this feature ensure a Clerk/Staff Member has been created in Swiftpos Back Office with Administrator authorisation to ensure access to Touch POS and Reception devices. Once selected, the next time the current Clerk/Staff Member logs in to either of the Touch POS and/or Reception devices, he/she will NOT be able to access other Windows applications. Access at the devices will be locked to Swiftpos software.
Notes ...
When this feature is selected and activated, accessing the Windows Task Manager (via Ctrl+Alt+Del) will not work. Also, if either the Touch POS or Reception devices crash, they will restart automatically. If the Clerk/Staff Member exists, the software will restart automatically.
- Full Debug Logging - Select to enable.
Notes ...
This should only be enabled when recommended.
- Button Logging - Select to ensure that the last 20 POS Keys selected at the Touch POS device are logged. This will assist in troubleshooting errors/exceptions when they occur at the Touch POS device.
- Weekly SDF Backup - Select to ensure a backup of the Touch POS database is made on a weekly basis. The backup generated will be named YYYMMDDTHHMMSSSS-SwiftTouch.bak (for example, 20261014T080320755-SwiftTouch.bak) and located in the C:\SwiftPOSTouch\Backups folder on the Back Office PC. Backups older than 28 days will be removed.
- NetPOS.Net Logging - Select to ensure NetPOS logging is turned on. Can be useful when troubleshooting issues.
Notes ...
These logs are located in C:\ProgramData\Samford Software\Network Trace Logs\SwiftPOS Touch Terminal
- Full TCP Logging - Select to ensure TCP logging is turned on. Can be useful when troubleshooting issues.
- Activate Screensaver after X Minutes - Select the checkbox and select the button to open the Enter Screensaver Timeout Numeric Keypad screen to enter/set the time in minutes that has to lapse in idle time before the Screensaver is activated.
Notes ...
If any message boxes/prompts are still open (in Touch POS) once the time configured has elapsed, the screensaver will NOT display until they have been addressed. Once addressed the time will be reset to ensure the screensaver is displayed after the configured time in minutes has elapsed.
- Disable Windows Touch Gestures - Select to ensure that access to other Apps is prevented when swiping either left or right (Windows Touch Slide Gestures) when in Full screen mode.
- Reseller Information - Displays the Venue's reseller details which may be useful when support is required. Reseller information is configured HERE.
- Print Job Logging - Select to ensure logging of printing activites.
Footer Section ▲ ▼
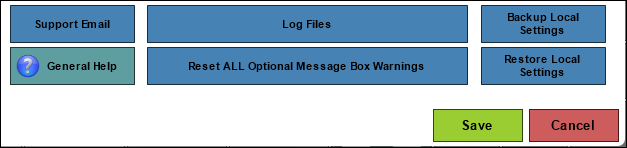
- Support Email - Select to open the Support Email Settings screen (see below) and configure the email settings for support requests.
- Log Files - Select to open the Windows Event Log Reader to access and view logging information.
- Backup Local Settings - Select to create a backup file of the Touch POS device settings and send it to the Back Office PC. The file generated, namely Settings.xml, is stored in the C:\SwiftPOSTouch folder on the Back Office PC.
- General Help - Select to open the Swiftpos Touch Help Menu.
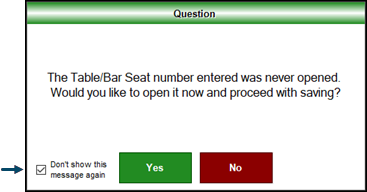
- Reset ALL Optional Message Box Warnings - Select to ensure all prompts that have the Don't show this message again option selected are reset to NOT selected. For example:
- Restore Local Settings - Select to restore a backup file of the Touch POS device settings.
- Save - Select to save any changes.
- Close - Select to exit.
End of article ▲