Venue Manager - Menus

To access, refer HERE. Used to access the menu options available in the Notify menu in Venue Manager.
The content is targeted at Resellers and Swiftpos Venue administrators who have a sound knowledge of and experience with Swiftpos. For further information or assistance, please contact your Swiftpos Reseller or Swiftpos Support.
IMPORTANT
DO NOT FORGET to select the Save/Update option to ensure all changes made are saved.
Menu Options ▲ ▼

Settings Menu Option ▲ ▼
Tabs
General Tab ▲ ▼

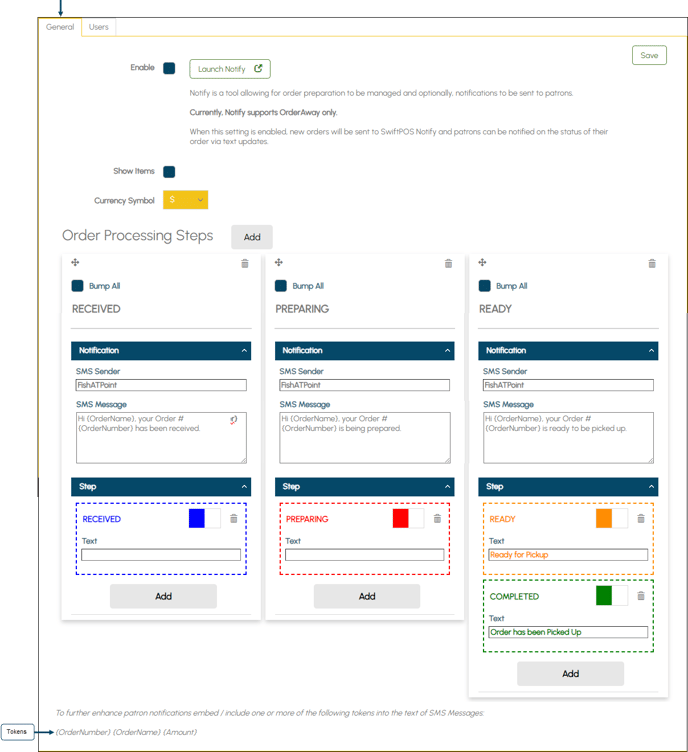
- Enable - Select to ensure the Notify tool is enabled. Once selected the Launch Notify option will be enabled.
- Launch Notify - Select to launch Notify and display the login screen.
Notes ...
Selecting the Enable option will affect what patrons see with regards to the confirmation of their Orders, by providing live feedback of the status of their Orders, as well as an advisory message “Please keep this page open to receive updates relating to your order."
- Show Items - Select to ensure an Items... option is displayed to enable the viewing of the items associated with an Order.
- Currency Symbol - Select from the drop-down list the appropriate currency symbol.
- Order Processing Steps - Displays the Order Processing Steps currently configured.
- Add- Select to add an Order Processing Step (column). ReferHERE for more information.
- Bump All – Select to ensure a Bump all option is displayed for the selected processing step. This will allow Staff to be able to bump all Orders listed in the processing step, to the next processing step. Refer HERE for more information.
- SMS Sender - Displays/Enter the name of the Venue's Location that will be sending SMS notifications to patrons.
- SMS Message - Displays/Enter the message patrons will receive via SMS when their Order is bumped/moved from one processing step (column) to another via the Orders screen.
Notes ...
SMS notification messages can be further enhanced by embedding/including the available tokens listed in the screen above. For example,
Hi {OrderName}, your order# {OrderNumber} has been received and will be ready soon.
- Steps - Displays the Additional Order Processing Steps as configured in the General tab.
- Name - Displays/Enter the name of the step. For example, Received, Preparing, Ready, etc. The name entered here is purely for reference purposes and will NOT be visible in NOTIFY.
- Colour - Displays/Set the background colour of the right arrow for the selected step.
- Delete icon - Select to delete the Additional Order Processing Step.
- Text - Displays/Enter the description of the step Staff will see in the Orders screen
- Add - Select to add additional steps within a single Order Processing Step. Refer HERE for more information.
 Example of how a configuration of the General tab is displayed in the Orders screen.
Users Tab ▲ ▼

Refer HERE for more information.
Header Section
- Add - Select to add a row to the grid for the entry of the new User's details. Refer HERE for more information.
- Cancel - Select to cancel the changes made.
- Save - Select to save the changes made.
Grid Section
Lists the Users along with their User, Password (hidden), Email and Delete option. Select anyone of their attributes to change/edit them.
Notes ...
The Delete option will only be visible once a user has been added. Refer HERE for more information.
End of article ▲
