

This provides an overview of the Cancel Sale (#5) POS Key.
Subjects ▲ ▼
About ▲ ▼
What Is Required? ▲ ▼
- Swiftpos v10+
- Ensure this POS Key is added to the appropriate Keyboard Layout using the Designer. Refer HERE for more information.
What To Consider? ▲ ▼
- If required, access to this POS Key can be restricted by the Clerk Security feature.
- If required, enforcing Clerks/Staff to provide reasons for the cancellation of the sales can be achieved by ensuring that the Enforce Reason Code option has been selected.
When Is It Used? ▲ ▼
Used to cancel an entire sale and record the value of the cancelled sale for Swiftpos Back Office Audit Reporting.
How To? ▲ ▼
How To GET STARTED? ▲ ▼
- Review About and ensure the steps outlined HERE are addressed.
- In Keyboard Designer, select the Cancel Sale (#5) POS Key that has been added to a Layout.
- Ensure it is given an appropriate Caption. For example, Cancel Sale.
- Select the More Settings option to display the Settings screen.
- Once configured, ensure a Full Update is sent to all the Touch terminals that will be using the POS Key. Refer HERE for more information.
Screens ▲ ▼
Settings Screen ▲ ▼
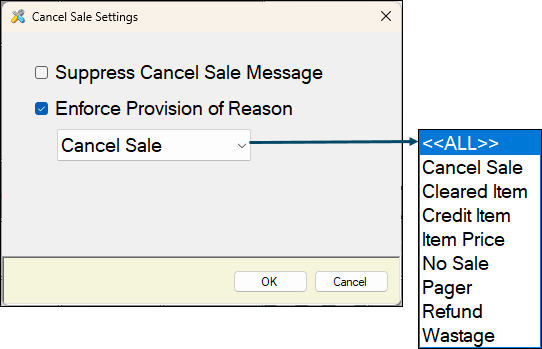
To access, select the More Settings option in Keyboard Designer. Used to configure the settings for the Cancel Sale (#5) POS Key.
- Suppress Cancel Sale Message - Select to ensure the Cancel confirmation prompt IS NOT displayed when cancelling a sale.
- Enforce Reason Code - Select to enforce the Clerk/Staff Member to select/enter a Reason for cancelling the current sale. Refer HERE for more information.
End of article ▲