- Swiftpos Help Guides
- POS Keys
- Accounts
-
Installers / Links / Releases
-
API
-
Back Office
-
Cloud Back Office
-
Events
-
Events Portal
-
How To
-
KVS
-
Member Portal
-
Notify
-
Oolio Pay
-
Orderaway
-
POS Keys
-
Self-Service Kiosk
-
Self-Service POS
-
Swiftpos
-
Touch
-
Touchmini
-
Troubleshooting
-
Venue Hub
-
Venue Manager
-
3rd Party Integrations
- Business Intelligence
- Cash Management
- eCommerce
- Exports / Imports
- Front Office Systems
- Fuel Systems
- Gaming
- General Ledger
- Gift Cards / Promotions / Vouchers
- Membership / Loyalty
- Middleware Applications
- Payment Integrators
- Product Level Blocking
- Reservations
- Swiftpos
- Tab Management
- Time & Attendance
- Value Added Services
-
Uncategorized
- API
- Back Office Accounts
- Back Office Administration
- Back Office - Clerks
- Back Office - Data Export
- Back Office - Inventory
- Back Office - Members
- Back Office - Menus
- Back Office - Products
- Back Office - Services
- Back Office - Suppliers
- Back Office - Swiftpos
- Back Office - Terminal Sales
- Back Office - Touch Settings
- Back Office - Vouchers / Discounts
- How To
- KVS
- OrderAway
- Venue Manager
- 3rd Party Integrations
- Touch
- Cloud Back Office
-
Touchmini v1 (End Of Life)
Account Payment (#200) POS Key
Touch - POS Keys

This provides an overview of the Account Payment (#200) POS Key.
Subjects ▼
What Is It Used For? ▲ ▼
This can be used to make Payments to or Top Up an Account in Touch. Refer to How To Pay / Top Up An Account for more information.
To Be Considered ▲ ▼
- If required, access to this POS Key can be restricted by the Clerk Security feature.
- The amount paid into an Account will only increase the Account's balance when the payment is processed in the Back Office. That is, when their is a connection to the swiftpos Back Office. For real time updating of Account balances, see Payment / Top Up.
- At any time an Account Summary can be printed to view amounts owing.
- Refer to Global Preferences - Auto Allocate Payments for more information.
What Is Required? ▲ ▼
- Ensure this POS Key is added to the appropriate Keyboard Layout using the Designer. Refer to How To Add A POS Key To A Keyboard Layout for more information.
- Ensure it is configured as required. Refer to the Settings below.
- Is given an appropriate Caption. For example, Account Payment/Top Up.
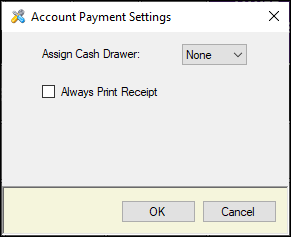
Settings ▲ ▼

- Assign Cash Drawer - Select from the drop down list the Cash Drawer to which the POS Key will be assigned to.
- Always Print Receipt - Select to ensure a Receipt is always printed.
End of article. ▲
