

Subjects ▲ ▼
About ▲ ▼
What Is It? ▲ ▼
Swiftpos stored-value vouchers from Ticketmaster events can be redeemed in Touch POS.
What Is Required? ▲ ▼
- Swiftpos v10.79.16+
- The Service Monitor service is running and is configured as is specified HERE.
- Ensure a Clerk/Staff Member exists that has the appropriate authorisation to access Vouchers and Voucher Mapping in Back Office. Refer HERE for more information.
- Ensure the Voucher Entry (#87) POS Key is added to the appropriate Keyboard Layout using the Designer. Refer HERE for more information.
What Is Supported? ▲ ▼
- Only Stored Value vouchers are supported.
What To Consider? ▲ ▼
- Each Ticketmaster voucher returned will have two entries in the Voucher Mapping screen. The first entry will be a Multi Use Mapping Type entry containing the ticketmaster barcode. The second entry will be a Ticketmaster Mapping Type entry containing the Ticketmaster event information. Such as, <eventName>|<eventId>|<sectionId>|<rowId>|<seatNumber>. For example, EVRO31HS|2500647FB7E97A12|SEC 3|Q|17

Notes ...
When Swiftpos retrieves vouchers from Ticketmaster it looks for an existing voucher (using the “Ticketmaster” mapping string) and will UPDATE the Mapping String (Multi use) barcode if there is an existing voucher with <eventName>|<eventId>|<sectionId>|<rowId>|<seatNumber>. This is because an existing voucher can have its ticketek barcode updated when the voucher is transferred by ticketmaster.
- The vouchers created will use the following values retrieved from Tickemaster vouchers returned:
- Valid From Date
- Valid To Date
- Stored Value
- Voucher Mapping String
- Issued On date
- Ticket event and seat info will also be stored on the voucher.
- The Venue must ensure the Ticketmaster eventName is unique (in the Ticketmaster system) for events that will be mapped to Swiftpos vouchers.
- Reporting - Will likely require the Venue to have access to Swiftpos HQ. More coming soon ...
- Ticketmaster issued voucher barcodes DO NOT allow for Swiftpos Card Masking to be configured in order to be able to identify that the scanned barcode is in fact related to a Ticketmaster voucher. It theoretically could also be a Member's Card, item/product, etc. Hence, the only way currently, to redeem a Ticketmaster voucher in Swiftpos is to use the Voucher Entry (#87) POS Key.
- Once the stored value of the voucher is retrieved, it is held in Swiftpos and maintained their as well. At no time is the current balance of the stored value of a voucher sent to Ticketmaster.
When Is It Used? ▲ ▼
Used to redeem Tickemaster issued stored-value vouchers for Ticketmaster events in Touch POS. Swiftpos will use the Service Monitor service to regularly poll Ticketmaster for vouchers for defined Ticketmaster events at a set interval.
How To? ▲ ▼
How To GET STARTED? ▲ ▼
This outlines the information and steps that are necessary to configure Swiftpos in order to implement and test the Netsuite REST API Interface.
- Review About and ensure the steps outlined HERE are addressed.
- Configure The Service Monitor Service
- Configure Back Office
Configure The Service Monitor Service ▲ ▼
- Navigate to the Service Monitor Settings screen.
- Ensure the details provided by Ticketmaster are entered in the appropriate fields in the screen. For example, API URL, API Key, Vendor Name and DSN.
- Ensure the remaining options are considered and configured as required for the Venue. For example, Enabled, Interval, Page size, Request timeout, Snapshot timeout, Accepted retry and Accepted retry Count.
- Select the Request Now option to ensure Ticketmaster data is retrieved.
- Select OK to save the changes and exit.
Configure Back Office ▲ ▼
In Back Office, do as follows:
Create A Ticketmaster Voucher ▲ ▼
- Navigate to the Vouchers screen.
- Select the New option in the footer section to create a new stored-value voucher for specific use as the default voucher for Ticketmaster.
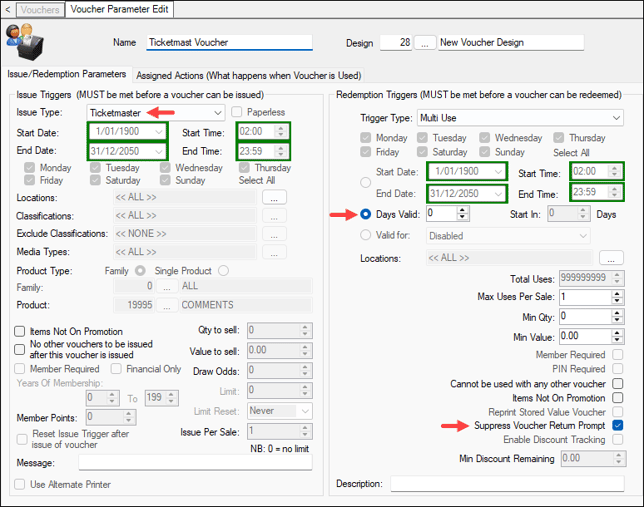
- Ensure the Ticketmaster option is selected in the Issue Type drop-down list.
- Ensure a value of zero (0) is entered in the Days Valid field.
Notes ...
This will ensure the voucher can only be redeemed on the day of the selected event. Vouchers can then be redeemed from midnight at the start of the event day to midnight of the last valid day. If any other value is entered into the Days Valid field, for example 3, then this will mean that Ticketmaster vouchers can be redeemed for 3 days commencing at the start of the event.
- Ensure the Suppress Voucher Return Prompt option is selected.
- Ensure the remaining options available are considered and configured as is appropriate for the Venue. For example:
- Ensure the Action assigned to the voucher is a Stored Value type action.
- Select Save to save the changes.
- Select Close to exit.
Configure Ticketmaster Settings ▲ ▼
- Navigate to the Settings screen in Data Portal.
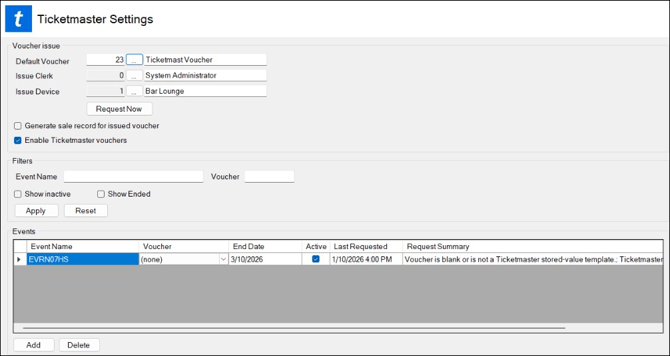
- Ensure the Ticketmaster voucher created HERE is selected against the Default Voucher option.
- Ensure the Clerk with the appropriate authorisation is selected against the Issue Clerk option. Refer HERE for more information.
- Ensure the appropriate device is selected against the Issue Device option. The device selected must be an active Touch POS, Waiter Station, Touch Lite or Touchv2 with a default Location.
- Ensure the Enable Ticketmaster vouchers option is enabled. If this is not selected, Back Office will not issue a Ticketmaster voucher.
- In the Event section add each Ticketmaster event (using the name Ticketmaster uses for the event as the Event Name).
- Ensure each has a Voucher selected against. If the Default Voucher is to be used, then leave (none) as the selected option.
- The End Date is optional. Leave blank to ensure polling for event data is maintained. If an Event Date is specified, Swiftpos will no longer request the event data once that date has been passed.
- Ensure the remaining options available are considered and configured as is appropriate for the Venue. For example:
- Select Save to save the changes.
- Select Close to exit.
- Going forward, each time the Service Monitor polls (Interval (minutes)) Ticketmaster, the list of events listed in the grid section will be updated as is appropriate, and the voucher barcodes associated with the listed events will be retrieved, along with their stored value.
- Restart the Service Monitor service.
Settings Screen ▲ ▼
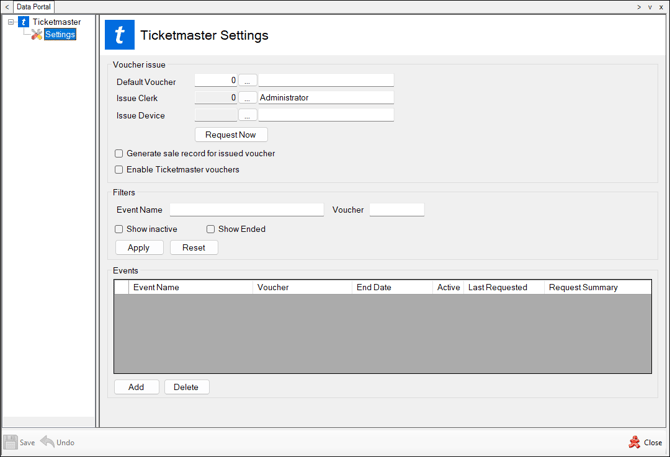
To access, select the Settings option from the Ticketmaster option of the Data Portal menu in Back Office.
Sections ▲ ▼
Voucher Issue Section ▲ ▼
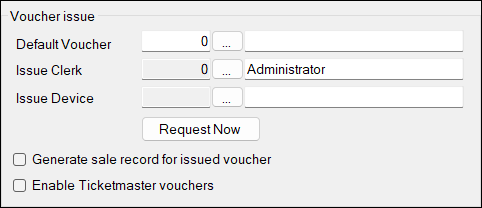
-
Default Voucher - Select to open the Search Voucher screen to select a voucher that is to be designated as the default voucher for Ticketmaster.
-
Issue Clerk - Select to open the Search Clerks screen to select Clerk/Staff Member that is to be designated as the voucher issuer.
-
Issue Device - Select to the Search Devices screen to select POS device that is to be designated as the device issuing the voucher.
-
Request Now - Select to retrieve the Ticketmaster vouchers for the events listed in the Events section.
-
Generate sale record for issued voucher - Select to ensure a sales transaction is generated for the Ticketmaster vouchers retrieved. This is by default NOT selected, as selecting it may impact performance and slow the retrieval of Ticketmaster vouchers down considerably. Therefore, it is recommended that this be left NOT SELECTED.
-
Enable Ticketmaster vouchers - Select to ensure the Ticketmaster vouchers feature is enabled, and in doing so, the Ticketmaster option will then be listed in the Issue Type drop-down list of the Voucher Parameter Edit screen.
Filters Section ▲ ▼
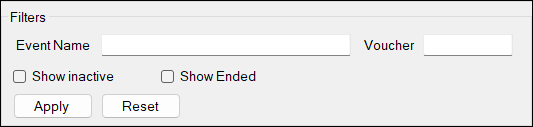
Used to limit the number of rows displayed in the grid section. Once all filters have been selected, select the Apply option to apply them. Otherwise, select the Reset option to clear all filters.
Events Section ▲ ▼
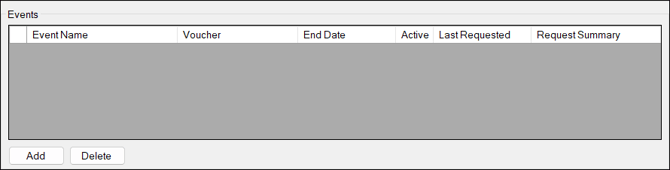
Lists the Ticketmaster events along with their Name, Voucher, End Date, Active status, Last Requested and Request Summary information.
Noteworthy
-
End Date - Displays/Set the date the event ends and ensure it is enabled. While the event is flagged as Active and the End Date has NOT passed, Ticketmaster vouchers for the event will be able to be redeemed.
- Active - Displays the status of the event. When not selected (depicting an Inactive status), Ticketmaster vouchers for the event will NOT be able to be redeemed.
Footer Section ▲ ▼

- Save - Select to save the changes.
- Undo - Select to undo the changes.
- Close - Select to exit.
Service Monitor Settings Screen ▲ ▼
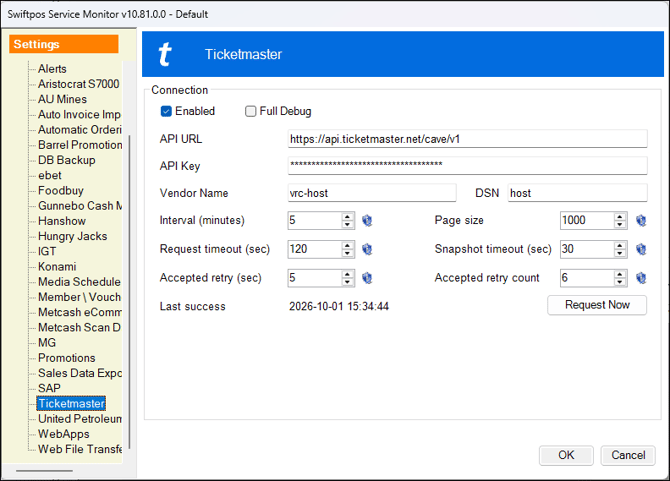
To access, refer to HERE for more information. Used to configure the settings required for the Ticketmaster interface.
- Enabled - Select to ensure the Ticketmaster interface is enabled. If not selected the Ticketmaster interface will not execute.
- Full Debug - Select to enable. This should only be enabled when recommended.
- API URL - Displays/Enter the API URL provided.
- API Key - Displays/Enter the API Key provided.
- Vendor Name - Displays/Enter the Vendor Name provided.
- DSN - Displays/Enter the DSN name provided.
- Interval (minutes) - Set to time (in minutes) that is required to lapse before the Ticketmaster portal is polled for updates to Ticketmaster event and voucher data. Ideally this would be set to occur once or a couple of times per day.
- Page Size - Displays/Enter the number of Ticketmaster voucher barcodes is returned per page.
- Request timeout (sec) - Displays/Enter the time in seconds that must elapse before the attempt to retrieve Ticketmaster vouchers is aborted.
- Snapshot timeout (sec) - Displays/Enter the time in seconds that must elapse before a timeout is triggered and a Snapshot GET request is aborted. The default is 30 seconds. A timeout on the first event Map stops the pull. A timeout on a later event Map stops remaining events.
- Accepted retry (sec) - Displays/Enter the time in seconds to wait before a retry to retrieve Ticketmaster vouchers is attempted again.
- Accepted retry count - Displays/Enter the number of times to attempt a retry of retrieving Ticketmaster vouchers.
- Last success - Displays the date/time of the last time Ticketmaster vouchers were retrieved successfully.
- Request Now - Select to retrieve the Ticketmaster vouchers for the events listed in the Events section of the Ticketmaster Settings screen.
Troubleshooting ▲ ▼
- A Ticketmaster pull is already in progress
- API key, vendor, DSN, or no Event Map
- Request Summary says the voucher, clerk or terminal is not valid
- Request Timed out
- saleFailed in Pull Complete
- Unable to connect to Service Monitor
- Verify counts after a pull
A Ticketmaster pull is already in progress ▲ ▼
What you see: That message in Pull Complete or the event log. Request Now does not start a second pull.
What to do: Wait for the current pull to finish. Keep one Service Monitor on this database. If you queued Request Now from Data Portal, it runs automatically once the current pull ends.
API key, vendor, DSN, or no Event Map ▲ ▼
What you see: Pull Complete says the API key is missing, vendor and DSN are required, or there are no active Event Names.
What to do: Complete Service Monitor → Ticketmaster connection (URL, key, vendor, DSN). On Data Portal, add at least one active Event Name and Save.
Request Summary says the voucher, clerk or terminal is not valid ▲ ▼
What you see: Last Requested has a time, but Request Summary explains why tickets were not fetched. Example: the Event Map voucher is blank or is not a Ticketmaster stored-value template.
What to do:
- Event Map: pick a Ticketmaster stored-value voucher, or leave it as (none) only when Default Voucher is set to one.
- Issue Clerk: choose a POS clerk who can open Vouchers and Voucher Mapping. Clerk 0 is valid if that clerk can.
- Issue Terminal: choose an active POS / waiter / Touch Lite / Touchv2 terminal that has a default location.
- Save, then Request Now. A bad clerk or terminal stops the whole pull. A bad voucher skips that Event Name only.
- Request Summary is written by the pull. It is not typed in by hand.
Request Timed out ▲ ▼
What you see: Pull Complete says Request Timed out. If it was the first Event Name, nothing was issued. If a later Event Name timed out, earlier events may still have issued; the message lists names that were not mapped.
What to do: Raise Snapshot timeout on the Service Monitor connection panel (default 30 seconds), or reduce how many Event Names are Active at once. Try Request Now again.
saleFailed in Pull Complete ▲ ▼
What you see: Vouchers issued, but Pull Complete includes saleFailed and the pull is marked Failed. The event log lists ledgers that did not get a sale record.
What to do: Confirm Connect is running if you need those journals. Do not expect a second Request Now to create the missing sale records — those seats will show as unchanged. Issue Terminal should be a dedicated terminal when Generate sale record is on.
Unable to connect to Service Monitor ▲ ▼
What you see: Data Portal Request Now says it cannot connect to Service Monitor.
What to do: Start Service Monitor (Windows service or the interactive app) against the same database. Wait a few seconds and try Request Now again.
Verify counts after a pull ▲ ▼
What you see: After a pull that issued or remapped vouchers, Pull Complete may list missingLedger, missingScan, or badBarcodeLength. An unchanged-only pull does not show verify counts.
What to do: Non-zero verify counts mean some issued vouchers did not match the expected barcode mapping. Check the event log for the barcodes listed, then Request Now again only if support asks you to.
End of article ▲