
Refer HERE for the IGT Bi Data Export content.
Subjects ▲ ▼
About ▲ ▼
What Is Required? ▲ ▼
- Swiftpos v10.79.18+
- Venues must have a current Software Enhancement Licence to use this feature.
What Is Supported? ▲ ▼
- Exporting of sales data for IGT EZ Insight as part of the End of Day process is an available option.
What To Consider? ▲ ▼
- Cancelled orders/sales related data will NOT be exported.
When Is It Used? ▲ ▼
Used to Export sales data for IGT EZ Insight. Exporting can also be included as part of the End of Day process.
Sales data can be exported as either Comma Separated Variable (.CSV) files or Text (.TXT) files. Either way, for each trading date of sales data retrieved, the following 3 files will be created with their respective file extension (depending on the File Type selected):
IGTItemExtract_YYYYMMDD File Format ▲ ▼
| Field Name | Field Description | Field Type |
| POSTransactionNumber | Transaction Number | Numeric |
| POSCheckNumber | Receipt Number | Numeric |
| ItemNumber | PLU Number |
Numeric |
| Description | Product Description | Alphanumeric |
| ItemCategory | Category Description | Alphanumeric |
| ItemType | Master Group | Alphanumeric |
| SaleAmount | Sales Price (Incl.) | Numeric |
| Quantity | Quantity Sold | Numeric |
IGTTenderExtract_YYYYMMDD File Format ▲ ▼
| Field Name | Field Description | Field Type |
| POSTransactionNumber | Transaction Number | Numeric |
| POSCheckNumber | Receipt Number | Numeric |
| TenderType | Media Name | Alphanumeric |
| SaleAmount | Sales Amount (Incl.) | Numeric |
| DiscountAmount | Discount Amount | Numeric |
IGTTransactionExtract_YYYYMMDD File Format ▲ ▼
| Field Name | Field Description | Field Type |
| POSTransactionNumber | Transaction Number | Numeric |
| POSCheckNumber | Receipt Number | Numeric |
| PatronCardNumber | Member ID |
Numeric |
| CashierNumber | Clerk ID | Numeric |
| CashierName | Clerk Name | Alphanumeric |
| WorkstationCostCentreName | Location Name | Alphanumeric |
| WorkstationID | Terminal ID | Numeric |
| SaleAmount | Sales Amount (Incl.) | Numeric |
| DiscountAmount | Discount Amount | Numeric |
| PointsRedeemed | Points Redeemed | Numeric |
| PointsAccrued | Points Awarded | Numeric |
| TransactionDate | Transaction Date | Date |
| TransactionTime | Transaction Time | Time |
How To? ▲ ▼
- Configure The Export Settings?
- Export Sales Data Automatically?
- Export Sales Data Manually?
- GET STARTED?
- Mark All Sales Transactions As Exported?
- Reset Sales Transactions And Mark As Not Exported?
How To Configure The Export Settings? ▲ ▼
To configure the settings for exporting sales data, do as follows:
- Navigate to the Settings screen by selecting the Settings option from the IGT EZ Insights option in the Data Portal menu in Back Office.
- Configure the Settings as is appropriate for the Venue:
- Ensure the type of file to be exported is selected from the Export As File Type drop-down list.
- Ensure a folder is specified in the Export To option, in which the exported sales data will be written to.
- Ensure the Venues for which sales data will be exported are selected in the Export For section.
- Select the Save option to save the changes.
How To Export Sales Data Automatically? ▲ ▼
To export sales data automatically, do as follows:
- Ensure the steps outlined in GET STARTED have been addressed.
- Stop the End of Day service.
- In the End of Day Options screen ensure the IGT EZ Insights Export option is selected for the Venues for which transactions will be exported.
- Confirm the End of Day Run Time is correctly configured.
- Restart the End of Day service.
- The first time the End of Day runs, check the End Of Day Service logs in the Event Logs, to make sure it completed successfully.
Notes...
The first time this Export runs successfully as part of the End of Day process, all sales transactions that are NOT marked as exported, will be exported.
How To Export Sales Data Manually? ▲ ▼
Do as follows:
- Navigate to the Export screen by selecting the Export option from the IGT EZ Insights option in the Data Portal menu in Back Office.
- In the Export Manually section confirm the settings for the As A ... File Type, To and For options are correct. If not, follow the steps outlined HERE to ensure the export settings are configured correctly.
- Ensure the required date range for the data to be exported is selected in the Sales Data From/To options.
- Select the Export option to invoke the export process.
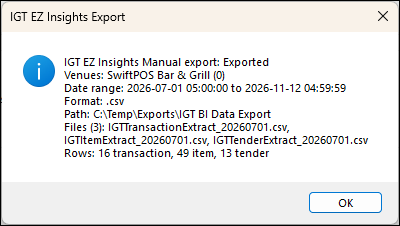
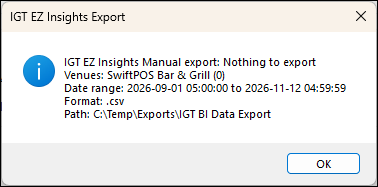
- When complete a prompt will be displayed confirming the success of the export. For example:
| Successful Export | Unsuccessful Export |
 |
 |
How To GET STARTED? ▲ ▼
It is recommended that initially when first implementing the IGT EZ Insights, the export of data is initially done manually to ensure that all is exported as expected. Once a number of manual exports have been successfully completed, the Venue can consider including the export as part of the End of Day process. In light of this, follow the steps outlined below to achieve both outcomes.- Review About and ensure the steps outlined HERE are addressed.
- Configure the export Settings. To achieve this follow the steps outlined HERE.
- Navigate to the Export screen by selecting the Export option from the IGT EZ Insights option in the Data Portal menu in Back Office.
- Mark all historical sales transactions as EXPORTED - Before commencing with exporting it is recommended to mark all sales data that is currently marked as NOT exported (which would include historical sales data) as exported. This will ensure that the first export will not include historical sales transactions that do not need to be exported. To achieve this follow the steps outlined HERE.
- Mark (reset) sales transactions as NOT EXPORTED - Once all sales transactions have been marked as EXPORTED, it is then necessary that for selected Trading dates the sales transactions are marked (reset) as NOT EXPORTED. This will ensure that the first export will only include those historical sales transactions that need to be exported. To achieve this follow the steps outlined HERE.
- Export sales transactions manually - Follow the steps outlined HERE.
- Once multiple exports of sales transactions have been done manually, and the exports have completed successfully, then:
- Include the exporting of IGT EZ Insight Sales Data in the End of Day (EOD) process - This is to ensure that on an ongoing basis, the export of sales data is handled automatically by the End of Day process. To achieve this, follow the steps outlined HERE.
How To Mark All Sales Transactions As Exported? ▲ ▼
To mark all sales transactions as exported, do as follows:
- Navigate to the Export screen by selecting the Export option from the IGT EZ Insights option in the Data Portal menu in Back Office.
- In the Reset Sales Transaction section select the For All ... Mark as Exported option.
- A prompt similar to the following will be displayed:
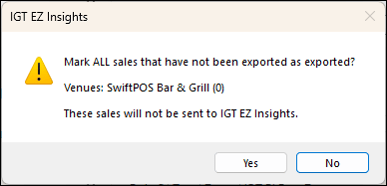
- Select the Yes option to proceed.
- Once completed, a prompt similar to the following will be displayed:
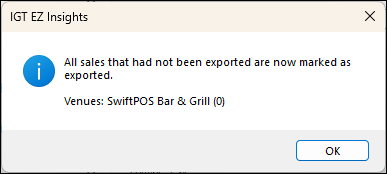
- Select OK to exit.
How To Reset Sales Transactions And Mark As Not Exported? ▲ ▼
To reset sales transactions and mark as NOT EXPORTED, do as follows:
- Navigate to the Export screen by selecting the Export option from the IGT EZ Insights option in the Data Portal menu in Back Office.
- In the Reset Sales Transaction section select the Trading Date for which sale transactions will be reset.
- Select the Mark as NOT Exported option to display a prompt, similar to the one below, for the operator to confirm:
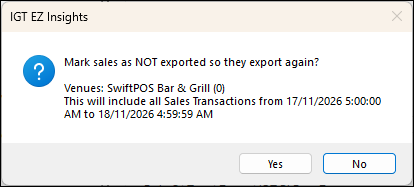
- Select the Yes option to proceed.
- Once completed, a prompt similar to the following will be displayed:
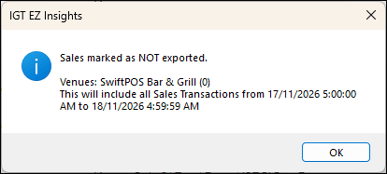
- Select OK to exit.
Screens ▲ ▼
Export Screen ▲ ▼
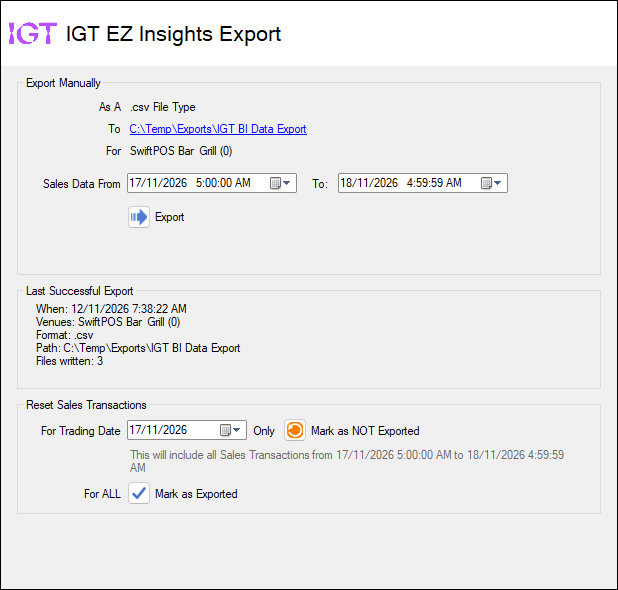
To access, select the Export option from the IGT EZ Insight Export option in the Data Portal menu in Back Office. Used to manually export sales data for the IGT EZ Insight Business Intelligence platform.
Sections ▲ ▼
Export Manually Section ▲ ▼
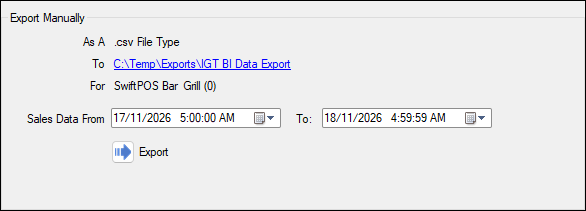
Used to select/set the options that are available when manually exporting sales data.
- As A ... File Type - Displays the format in which sales data will be exported. This option is configured HERE.
- To - Displays the folder in which the exported sales data will be written to. Select the path to open the folder. This option is configured HERE.
- For - Displays the Venues for which sales data will be exported. This option is configured HERE.
- Sales Data From/To - Enter/Select the date/time range for which sales data will be exported.
- Export - Select to create multiple daily CSV or TXT type files in the Export Path selected. Refer HERE for more information.
Last Successful Export Section ▲ ▼
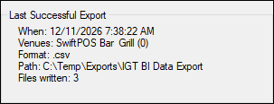
Displays information regarding the last time a successful export of sales data was completed.
Reset Sales Transactions Section ▲ ▼
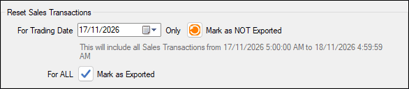
Used to mark sales transactions as exported OR reset them and mark them as NOT exported.
- For Trading Date - Displays/Set the Trading date for which transactions are to be marked as exported OR reset them and mark them as NOT exported.
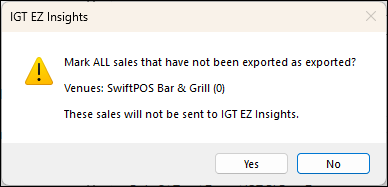
- Mark as NOT Exported - Select to mark all the sales data related transactions for the selected Trading date as NOT exported, thus ensuring they can be exported again. Once selected, a prompt, similar to the one below, will be displayed for the operator to confirm.
- For ALL ... Mark as Exported - Select to ensure all sales data related transactions are marked as exported for the selected Trading Date. Once selected, a prompt, similar to the one below, will be displayed for the operator to confirm.
Settings Screen ▲ ▼
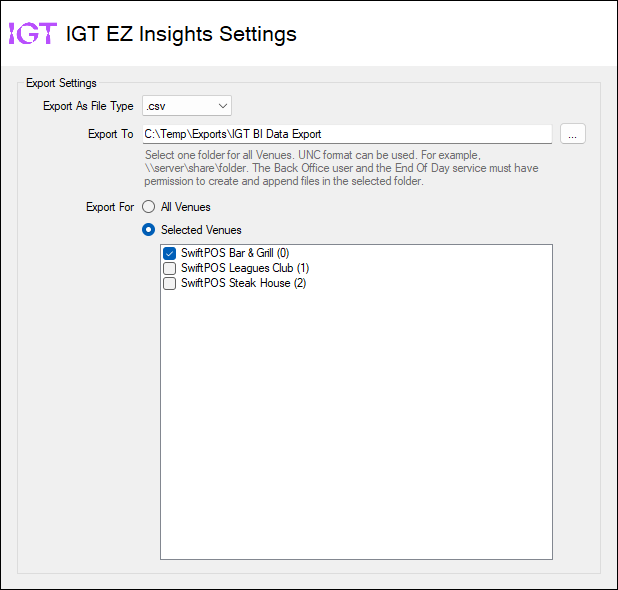
To access, select the Settings option from the IGT EZ Insight Export option in the Data Portal menu in Back Office. Used to configure the settings for the exporting of sales data for the IGT EZ Insight Business Intelligence platform.
- Export As File Type - Select from the drop-down list the required format in which the exported sales data will be written. Refer HERE for more information.
- Export To - Select the select option to the right of the Export Path field to locate and select the folder in which the exported sales data will be written to. Refer HERE for more information.
- Export For - Select either:
- All venues - Select to ensure sales data for all Venues listed in the grid below is exported.
- Selected venues only - Select to ensure sales data for only the Venues selected in the grid is exported.
End of article ▲