
This provides an overview of the Customer (#102) POS Key. Refer HERE and HERE for more information.
Subjects ▲ ▼
About ▲ ▼
What Are The Limitations? ▲ ▼
- The number of Customer/Members returned by a search is limited to a maximum of 50. This is to reduce network traffic.
What Is It? ▲ ▼
Used to lookup/retrieve a Customer/Member or add a Customer/Member to an Order/Sale in Touch.
What Is Required? ▲ ▼
- Swiftpos v10+
- Ensure this POS Key is added to the appropriate Keyboard Layout using the Designer. Refer HERE for more information.
What To Consider? ▲ ▼
- If required, access to this POS Key can be restricted by the Clerk Security feature.
When Is It Used? ▲ ▼
Used to lookup/retrieve a Customer/Member and add it to an Order/Sale in Touch. The Customer/Member can be retrieved from Swiftpos Back Office or a NetPOS interface. For example, Zen Global.
How To? ▲ ▼
How To GET STARTED? ▲ ▼
- Review About and ensure the steps outlined HERE are addressed.
- In Keyboard Designer, select the Customer (#102) POS Key that has been added to a Layout.
- Ensure it is given an appropriate Caption. For example, Customer/Member Lookup.
- Select the More Settings option to display the Settings screen.
- Configure the POS Key by selecting the options available HERE.
Notes ...
Ensure the correct Interface (NetPOS) is selected. For example, to lookup Swiftpos Customers/Members, ensure the SwiftPOS Back Office interface is selected. To lookup Zen Global Customers, ensure the Zen Global interface is selected.
- Once configured, ensure a Full Update is sent to all the Touch terminals that will be using the POS Key. Refer HERE for more information.
- Configure Card Masking
If required, Card Masking may need to be configured for Peripheral devices that are used by Touch to scan Customer/Member Cards/IDs/mobile phone numbers (Zen Global), etc. and used in conjunction with this POS Key. Refer HERE for more information.
Notes ...
For those Venues that are integrating with Zen Global and are wanting to scan the mobile phone numbers of Zen Global Customers when doing a Customer lookup, they will need to ensure the Card Mask of the type Zen Mobile Member is configured for the Peripheral device used for scanning.
How To Use This POS Key? ▲ ▼
Screens ▲ ▼
Customer Search Screen ▲ ▼
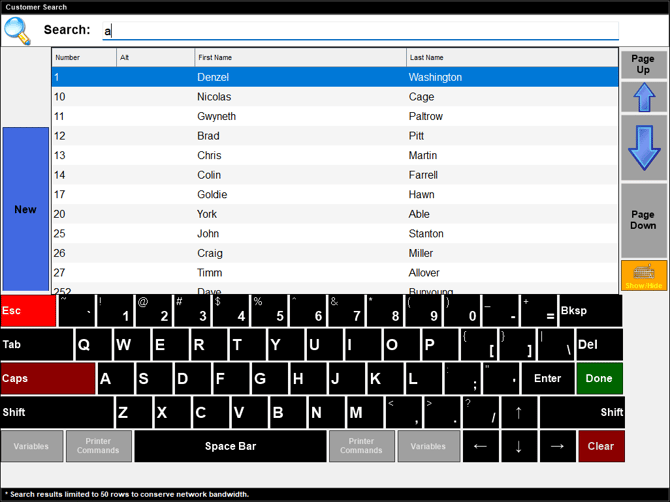
To access, select the Customer (#102) POS Key in Touch. Used to locate and select a Customer/Member.
Header Section
- Search - Enter text to lookup a Customer/Member that has the text entered, in either their names/addresses/contact details/etc.
Notes ...
A lookup can also be conducted based on the full/partial entry of an Address, Email Address or Mobile Phone Number. Even though these may not be visible in the grid, they can still be used to do a lookup.
The number of Customer/Members returned by a lookup is limited to a maximum of 50. This is to reduce network traffic.
Grid Section
Lists the Customer/Member Number, Alt (Alternate ID), First Name, Last Name and Address information of up to 50 Customer/Members returned by the lookup.
Notes ...
The Address information will only be displayed if the Show First Address Line on Customer Search Screen option has been selected.
Selecting the Customer/Member currently highlighted will add the Customer/Member to the Order/Sale.
Grid Buttons
- Edit - Select to open the Customer Details screen to edit the Customer/Member's details.
- New - Select to open the Customer Details screen to add a new Customer/Member.
Notes ...
To ensure the New option is hidden, select the Disable New Customer Button from Customer Search Screen option.
- Up/Down Arrows / Page Up/Down - Select to navigate through the Customer/Members displayed in the grid.
- Keyboard Show/Hide - Select to show/hide the keyboard.
Keyboard Section
Use the keyboard displayed at the bottom of the screen to enter text to lookup a Customer/Member.
Notes ...
How Customer/Member details are displayed in the sales grid can be configured HERE.
How Customer/Member details are printed on Receipts can be configured HERE.
Settings Screen ▲ ▼

To access, select the More Settings option in Keyboard Designer. Used to configure the settings for the Customer (#102) POS Key.
- Available Interfaces - Select from the drop down list the required Interface.
Notes ...
If no interface is selected, the default used will be the interface which is set as Default in NetPOS.
- Set/Change Selected Interface - Select to select the interface selected above and set the following:
- Alternate Member Look Up - Select to do a Customer/Member lookup using the Alternate Member ID, rather than using the default, Member Number.
- Use EFTPOS Card Reader - Select to use the EFTPOS Card Reader to access the Customer/Member's Card.
- Override Next Card Swipe - Select to ensure the next time a Customer/Member's Card is swiped, it will override the default operation.
- Account Members Only - Select to limit the lookup of Customer/Members to only those that have a Charge Limit of greater than zero.
- Don't Prompt When Changing Members - This option supresses the Prompt at Touch when changing the Member in a Sale.
- Display Numeric Keyboard For Search - Select to only display a numeric keypad in the Customer Search screen, to replace the qwerty keyboard displayed as default.
- Zen Mobile Phone Member Look Up - Select to ensure Customer/Members can be searched in Zen Global using their mobile phone number.
Notes ...
If required, a Card Mask can be configured for the Barcode Scanner to ensure that when scanning a Customer's/Member's mobile phone number, a Zen Global lookup is initiated. Refer HERE for more information.
End of article ▲