![]()
Refer HERE for Internal Help Guide Information.
Refer HERE for Reseller & Support information.
This outlines the information and the steps that are required to install and implement the Accounts Flow interface.
The content is targeted at Resellers and Swiftpos Venue administrators who have a sound knowledge of and experience with Swiftpos. For further information or assistance, please contact your Swiftpos Reseller or Swiftpos Support.
Subjects ▲ ▼
About ▲ ▼
What Is It? ▲ ▼
The Accounts Flow interface is used to import Accounts Flow Invoices into Swiftpos Back Office.
What Is Required? ▲ ▼
- A Swiftpos registration with a Software Enhancement date of 20 Sep 2018 or more recent.
What To Consider? ▲ ▼
- For Venues that have multiple Location Groups (Venues) configured in Swiftpos Back Office, it is recommended that the Enable Location Based Suppliers option is selected. This will ensure that the individual Location Groups (Venues) can only see their specific Supplier Invoices.
- With the Enable Location Based Suppliers option selected, the Search Suppliers screen that is displayed, when selecting a cell in the Supplier column of the Download Accounts Flow Invoices screen, will only display those Suppliers associated with Locations that are in the Location Group selected in the header section of the same screen.
- Invoices are MATCHED to Swiftpos Suppliers, as follows:
- Purchase Order number (PO#) first. If the Accounts Flow Invoice's PO# matches with a Swiftpos PO#, then the Location and Supplier associated with the Swiftpos PO will be used. If the Accounts Flow Invoice's PO# is NOT matched, then Invoices will be matched by:
- ABN first and then Account ID, if the Match on ABN First option is selected in the Settings screen.
- Account ID first and then ABN, if the Match on ABN First option is NOT selected in the Settings screen.
- Purchase Order number (PO#) first. If the Accounts Flow Invoice's PO# matches with a Swiftpos PO#, then the Location and Supplier associated with the Swiftpos PO will be used. If the Accounts Flow Invoice's PO# is NOT matched, then Invoices will be matched by:
- Invoices that are NOT MATCHED to Swiftpos Suppliers, will be listed in the grid without a value displayed in the Supplier column, and will also be displayed regardless of which Location Group is selected in the header section. This will ensure that all unmatched invoices are visible across all Location Groups.
When Is It Used? ▲ ▼
Used to import Accounts Flow Invoices into Swiftpos Back Office.
How To? ▲ ▼
How To GET STARTED? ▲ ▼
Do as follows:
- In Swiftpos Back Office:
- Expand the Suppliers menu.
- Select the Import Invoices menu option.
- Select the Download option and then from the Accounts Flow option, select the Settings option to display the Accounts Flow Settings screen.
- In the Accounts Flow Settings screen:
- Select the Add option to add a row in the grid.
- In the grid, select the cell of the Location Group column to open the Search Location Groups screen, to locate and select the required Location Group.
- In the cell of the Folder column enter the path of the folder into which the Accounts Flow Invoices will be downloaded. For example, C:\Accounts Flow\Invoices.
- Select from the drop-down list in the cell of the Connection column one of the following:
- URL
- Then in the cell of the URL column, enter the URL provided by Accounts Flow.
- Select from the drop-down list in the cell of the Authentication column one of the following:
- Key
- Then in the cell of the Key column, enter the Key provided by Accounts Flow.
- Key
- URL
-
-
-
-
-
- User Name
-
- Then in the cell of the User Name column, enter the User Name provided by Accounts Flow.
- In the cell of the Password column, enter the Password provided by Accounts Flow.
-
- User Name
-
- FTP
- Then in the cell of the FTP Server column, enter the Server provided by Accounts Flow.
- In the cell of the FTP Folder column, enter the path of the folder provided by Accounts Flow.
- Select from the drop-down list in the cell of the Authentication column one of the following:
- Key
- Then in the cell of the Key column, enter the Key provided by Accounts Flow.
- User Name
- Then in the cell of the User Name column, enter the User Name provided by Accounts Flow.
- In the cell of the Password column, enter the Password provided by Accounts Flow.
- Key
-
- Set the Timeout in seconds. This is the maximum amount of time allowed to establish a connection to Accounts Flow. If set to value that is too low and there is not enough time to establish as connection, a warning prompt will be displayed when the Test option is selected. Refer HERE for more information. The default is 30.
- Consider selecting the Match on ABN First option.
- Select the Test option to test the connection.
- Once successful connection has been established, select Save to save the configuration.
- Select Close to exit the screen.
- Follow the steps outlined HERE.
-
-
How To Import Invoices? ▲ ▼
Do as follows:
Do as follows:
- In Swiftpos Back Office > Suppliers > Import Invoices - Select the Download option and then select the Accounts Flow option.
- The Download Accounts Flow Invoices screen will be displayed and populated with the Invoices available for the Location Group selected in the header section, as well as any Invoices that could not be matched to a Supplier.
- Invoices that cannot be matched to a Supplier using either the Purchase Order #, Account ID or ABN, will have no Supplier displayed in the Supplier column. Select the blank Supplier to open the Search Suppliers screen and select a Supplier.
Notes ...
Invoices displaying no value in the Supplier column, will NOT be able to be downloaded. A Supplier must be selected first.
- Using either the All option or the checkboxes in the grid, select the Invoices to be downloaded.
- Select the Download option to commence downloading and populate the Import Invoices screen with the downloaded Invoices.
- If an Invoice has previously been downloaded and is still listed in the Import Invoices screen, it won't be downloaded again.
Do as follows:
- The downloaded Invoices will be displayed in the Import Invoices screen. Those that have the Select checkbox selected have been successfully matched by the download process.
- Individually select and match (by selecting the Match option) each unmatched Invoice. This is done via the Match Invoice screen.
- Once the Invoice has been loaded into the Invoice Match screen, select each of the unmatched Products (identified by blank values displayed in the Product Code column), to open the Match Product screen and select a matching Swiftpos Product.
- Save and Close the Match Invoice screen.
- The Invoice should now appear in the grid of the Import Invoices screen with the Matched checkbox selected.
Do as follows:
- Once Invoice have been downloaded and matched, they will be displayed in the Import Invoices screen with the Matched checkbox selected.
- Select the Open option to open the selected Invoice (current row selected) in the Invoice/Receipt Goods screen.
Notes ...
The Open option will only be enabled if the selected Invoice is matched.
- Select the Save as Pending option to save all selected (that is, all rows with the Select and Matched checkboxes selected) Invoices as Pending. Once saved, they will be able to be retrieved via the Invoice/Receipt Goods screen.
Screens ▲ ▼
Accounts Flow Settings Screen ▲ ▼

To access, select the Settings option from the Accounts Flow menu option, when the Download option is selected in the Import Invoices screen. Used to configure/view the Accounts Flow interface configuration in Back Office.
Grid Section
- Location Group - Select from the drop down list the Location Group for which Invoices are to be downloaded.
- Folder - Displays/Select the folder into which the Accounts Flow Invoices will be downloaded.
- Connection - Displays the type of connection that is currently configured for the Location Groups (Venues) listed. Select from the drop-down list one of the following:
- FTP - If selected, then ensure the following are specified:
- FTP Server
- FTP Folder
- URL - If selected, then ensure the following are specified:
- URL
- FTP - If selected, then ensure the following are specified:
- Authentication - Displays the type of authentication that is currently configured for the Location Groups (Venues) listed. Select from the drop-down list one of the following methods of authentication to enable access to the Accounts Flow portal:
- Key - Displays/Enter the Key provided by Accounts Flow.
- User Name - Displays/Enter the credentials provided by Accounts Flow.
- Timeout - Displays/Enter the maximum time allowed in order to establish a connection.
- Match on ABN First - Select to ensure that when importing an Accounts Flow invoice, matching is first done on ABN then by Account ID. If not selected, then matching is first done on Account ID then by ABN.
- Test - Select to test the settings.
Footer Section
- Add - Select to add a row in the grid and configure the settings for a new Location Group (Venue).
- Delete - Select to remove the selected row from the grid.
- Copy To - Select to copy the settings of the selected row in the grid and copy them for a new Location Group (Venue), by adding a new row to the grid.
Download Accounts Flow Invoices Screen ▲ ▼
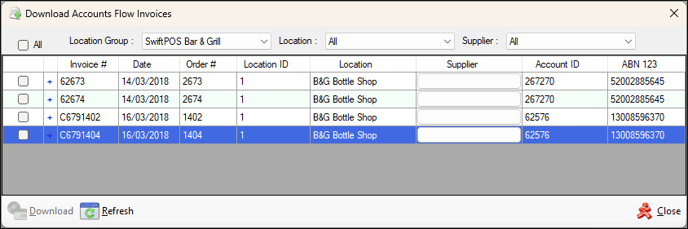
To access, select the Download option in the Import Invoices screen. Used to download/view the Accounts Flow Invoice available for downloading into Swiftpos Back Office.
Header Section
- All - Select to ensure all Invoice listed in the grid are selected.
- Location Group - Select from the drop-down list of Location Groups (Venues), to only display the Invoices for the selected Location Group (Venue) in the grid.
Notes ...
Invoices that are NOT MATCHED to Swiftpos Suppliers, will be listed in the grid without a value displayed in the Supplier column, and will also be displayed regardless of which Location Group is selected here. This will ensure that all unmatched invoices are visible across all Location Groups.
- Location - Select from the drop-down list of Locations, to only display the Invoices for the selected Location in the grid.
- Supplier - Select from the drop-down list of Suppliers, to only display the Invoices for the selected Supplier in the grid.
Grid Section
Lists the Accounts Flow Invoices (subject to the filters selected in the header section above) available for downloading.
Notes ...
Invoices that match to a Swiftpos Purchase Order, will be downloaded using the Location of the Purchase Order.
Footer Section
- Download - Select to download only those Invoice that have been selected in the grid.
- Close - Select to exit the screen.
Troubleshooting ▲ ▼
This provides information to assist when troubleshooting issues encountered while using the Swiftpos Accounts Flow interface.
Issues
Test Unsuccessful - Web Response Error - The operation has timed out ▲ ▼
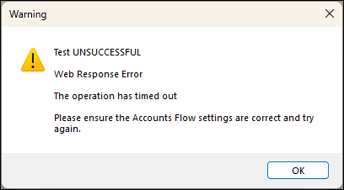
This issue may arise as a result of one of the following:
- The Timeout value configured HERE, is too low.
- Establishing connection to the Accounts Flow Invoicing portal is taking too long.
Action To Be Taken
- Increase the value configured in the Timeout column.
- Try again at a later at a time when internet traffic is less and there is more of a chance of being able to establish a connection.
End of article ▲