
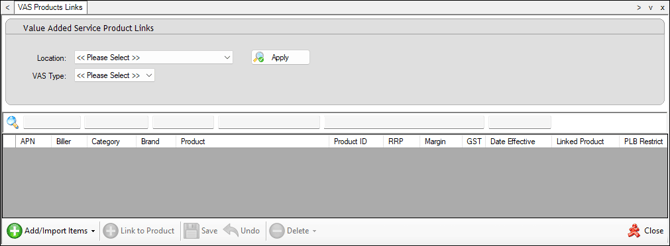
This menu option is used to manage VAS (Value Added Services) items/products.
Refer HERE for more information.
Subjects ▲ ▼
About ▲ ▼
What Is Required? ▲ ▼
- In Touch ensure a Table Tracking connection has been established, and a Table Tracking Master Touch POS device has been enabled.
What Is Supported? ▲ ▼
The VAS Product types currently supported are:
When Is It Used? ▲ ▼
Used to manage VAS (Value Added Services) items/products (such as Gift cards, Digital Accounts (Blackhawk POR (PIN On Request) items/products), MoneyGram, Phone Cards, Phone recharges, Trailer Hire, Vouchers, etc.) and in some instance to link these to items/products in Back Office.
Screens ▲ ▼
VAS Product Links Screen ▲ ▼
To access, select VAS Product Links option in the Vouchers/Discounts menu.
Sections ▲ ▼
Header Section ▲ ▼
-
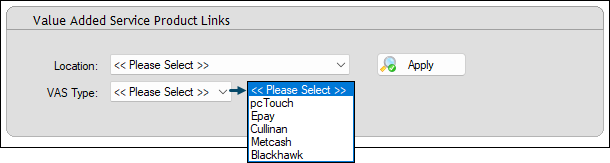
Location - Select from the drop-down list of Locations available. This will ensure that when the Apply button is selected, the VAS Products will be listed along with the Linked Products specific to the selected Location.
Notes ...
The selection of the Location does NOT act as a filter on the number of the VAS Products returned. It only applies to the Linked Thus, enabling Location specific Products to be linked to the same VAS Product.
- VAS Type - Select from the drop-down list of currently supported VAS Types:
- Apply - Select to apply the selection.
Grid Section ▲ ▼
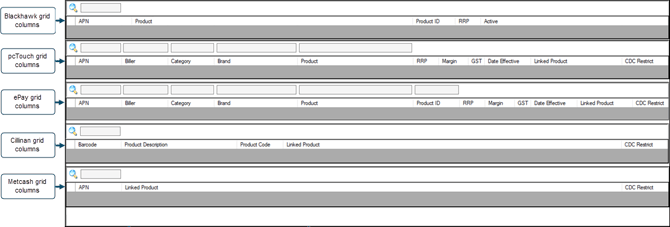
What the grid displays will be dependent on the VAS Type selected.
Noteworthy
-
Linked Product - Displays the Swiftpos Product that is linked to the Value Added Service being sold
Notes ...
To Delete a Linked Product select the row and then select the Delete > Linked Product option.

- Add/Import Items - Select from the drop-down list to import one of the following Product files:
- From ePAY - Select to select the CSV file to be imported.
- From pcTouch - Select to select the CSV file to be imported.
- Add Metcash Card - Select to open the Add New Gift Card screen to enter/scan the Barcode for a Metcash Gift Card (For example Gift Cards for The Bottle-O, Cellarbrations, Porters, Mitre 10, Home Timber Hardware and IGA.
- Add Blackhawk Product - Select to open the Add/Edit Blackhawk Product screen to add/edit a Blackhawk Product.
- Add Cullinan Products - Select to open the Cullinan Product screen to add a Cullinan Product.
- Edit - Select to edit the selected Product.
- Link to Product - Select to open the Search Products screen to link the selected Product to a Swiftpos Product.
- Save - Select to save changes.
- Undo - Select to undo changes.
- Delete - Select from the drop-down list one of the following:
- Delete Links - Select to delete the values in the Linked Products column for the rows currently selected.
- Delete Products - Select to delete the currently selected rows.
- Close - Select to exit.
Blackhawk ▲ ▼
Venues can, using the Blackhawk VAS Type option, to add/edit Blackhawk POR (Pin On Request) items/products (provided by Blackhawk) here. For more information refer to the Blackhawk 3rd Party Interface.
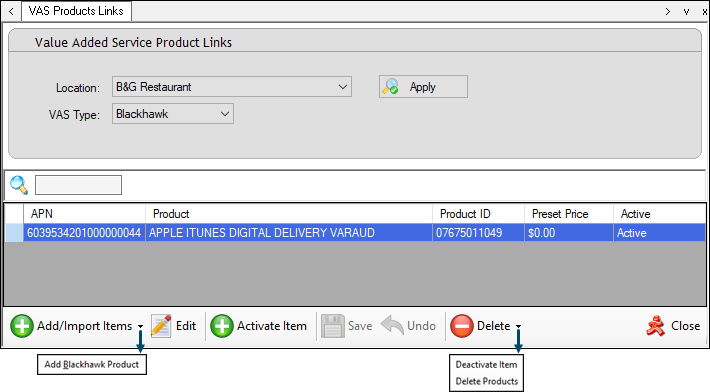
Example of a Blackhawk POR item/product added via the VAS Product Links menu option.
Header Section
- Location - Select from the drop-down list the Location to filter the grid on.
- VAS Type - Select from the drop-down list the Blackhawk option.
Grid Section
With the Blackhawk VAS Type option selected, the grid will display the following columns:
- APN - Displays the Card #/ APN / PAN number provided by Blackhawk.
- Product - Displays the Description of the Blackhawk provided item/product.
- Product ID - Displays the item's/product's ID / UPC provided by Blackhawk.
- Preset Price - Displays the Preset Price. A value of ZERO, will indicate no Preset Price and the Price will need to be entered in Touch at the time of the Top Up operation.
- Active - A value of Active displayed indicates the associated item/product is available to be searched/selected in Touch. No value displayed indicates the associated item/product is NOT available to be searched/selected in Touch.
Footer Section
- Add/Import Items - Select the Add Blackhawk Product option from the drop-down list to open the Add/Edit Blackhawk Product screen to add a item/product.
- Edit - Select to open the Add/Edit Blackhawk Product screen to edit the selected item/product.
- Activate Item - Select to ensure the selected item/product is set as Active, thus ensuring it can be searched/selected in Touch.
- Delete - Select from the drop-down list one of the following:
- Deactivate Item - Select to deactivate the selected items/products. Once deactivated, no value will be displayed in the Active column against the selected items/products.
- Delete Products - Select to delete the selected items/products.
ePay ▲ ▼
- Import from ePAY, the VAS selected Product file provided using Add/Import Items > From ePAY option. Should be in the form of a CSV file or similar.
- Create Products in the Back Office that will link to the VAS Products imported. For example, Linking an Itunes gift card, will need a Back Office Product/PLU to be created, so that it can be sold in Touch.
- Link the Swiftpos Products created to the VAS Product using the Link to Product button. This can be done by double clicking a cell in the Linked Product column.
- Add VAS Products POS Keys to the appropriate Keyboard Layout using the Keyboard Designer. Once added ensure the appropriate POS Key settings are correctly set. That is, select either one of the following:
- eVoucher (PIN) - Enter the APN as per the VAS Product Links.
- Electronic Top Up (Card) - To scan an ePAY Card.
- Gift Card - Select to scan an ePAY Gift Card.
- POS-A Card
- Loyalty Card
- Wallet / Pay
- If needed also add the Reprint VAS Vouchers POS Key to the appropriate Keyboard Layout.
- Send a full update to Touch.
- At Swiftpos Touch in Interface List - Select Add New and select the Value Added Service option required.
- Once added configure the settings for the selected VAS Type added.
- Startup Touch and ensure a full update is sent to Touch.
- Sell a VAS ePAY Product using one of the VAS Product POS Keys available on the Keyboard.
- Finalise the sale. It functions much like EFTPOS, in that on finalisation the Product will be validated with ePAY.
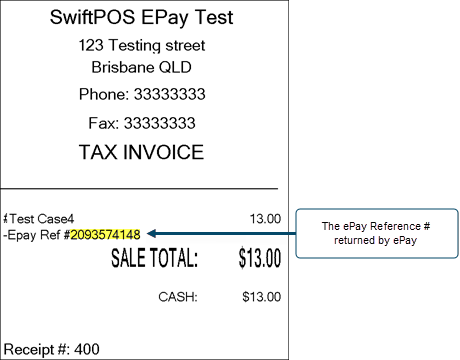
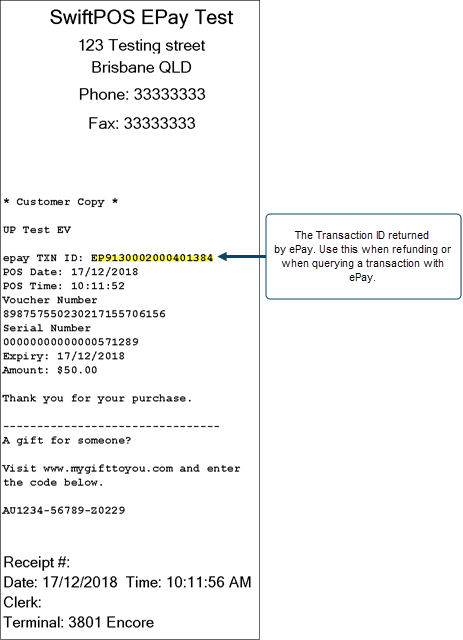
- The Receipt (Tax Invoice) and the Customers Copy will report a Reference # (Epay Ref #) and transaction ID (epay TXN ID) as returned by ePAY.
Add / Edit Blackhawk Product Screen ▲ ▼
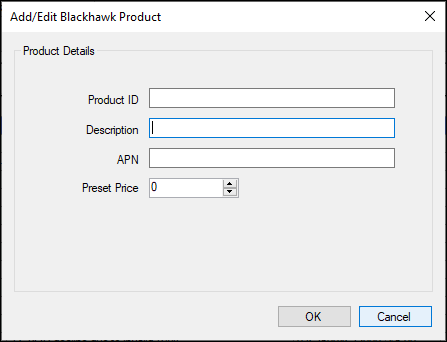
- Product ID - Displays/Enter the item's/product's ID / UPC provided by Blackhawk.
- Description - Displays/Enter the description of the Blackhawk provided item/product.
- APN - Displays/Enter the Card #/ APN / PAN number provided by Blackhawk.
- Preset Price - Displays/Enter Preset Price. A value of ZERO, will indicate no Preset Price and the Price will need to be entered in Touch at the time of the Top Up operation.
End of article ▲