-
Installers / Links / Releases
-
API
-
Back Office
-
Back Office Cloud
-
Events
-
Events Portal
-
How To
-
KVS
-
Member Portal
-
Notify
-
Oolio Pay
-
Orderaway
-
POS Keys
-
Self-Service Kiosk
-
Self-Service POS
-
Swiftpos
-
Touch
-
Touchmini
-
Troubleshooting
-
Venue Hub
-
Venue Manager
-
3rd Party Integrations
- Business Intelligence
- Cash Management
- eCommerce
- Exports / Imports
- Front Office Systems
- Fuel Systems
- Gaming
- General Ledger
- Gift Cards / Promotions / Vouchers
- Membership / Loyalty
- Middleware Applications
- Payment Integrators
- Product Level Blocking
- Reservations
- swiftpos
- Tab Management
- Time & Attendance
- Value Added Services
-
Uncategorized
- API
- Back Office Accounts
- Back Office Administration
- Back Office - Clerks
- Back Office - Inventory
- Back Office - Members
- Back Office - Menus
- Back Office - Products
- Back Office - Services
- Back Office - Suppliers
- Back Office - swiftpos
- Back Office - Terminal Sales
- Back Office - Touch Settings
- Back Office - Vouchers / Discounts
- How To
- KVS
- OrderAway
- Venue Manager
- Back Office - Data Export
-
Touchmini v1 (End Of Life)
Access The Configuration Tabs
OrderAway - How To
This outlines How To Access The Configuration tabs for Orderaway.
Swiftpos Back Office integrates with the Venue Manager tool offering Venues the ability to manage and configure their Orderaway web-based platform in support of both remote and in-Venue ordering.
How To? ▲ ▼
How To Access The Configuration Tabs? ▲ ▼
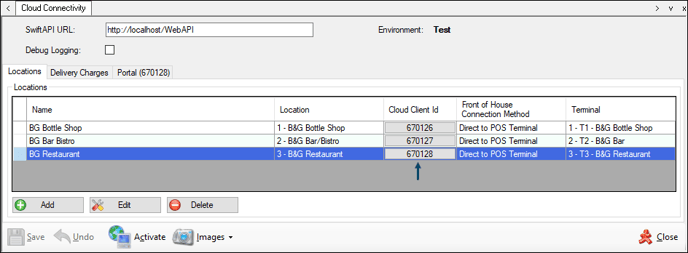
Access is via Venue Manager or by selecting a value in the Cloud Client ID column opposite the required Location in the Locations tab of the Cloud Connectivity screen in Back Office.

Once selected the Orderaway Profiles screen will be displayed by default. Select the name of one of the Profiles listed, in order to access it's Configuration tabs.
Refer HERE for more Orderaway menu options.
End of article ▲