
Subjects ▲ ▼
About ▲ ▼
When Is It Used? ▲ ▼
Used to configure Events/Sessions to support the managing and reporting of event related orders/sales as well as the export of Event Analysis related orders/sales data.
How To? ▲ ▼
Screens ▲ ▼
Event Types Screen ▲ ▼
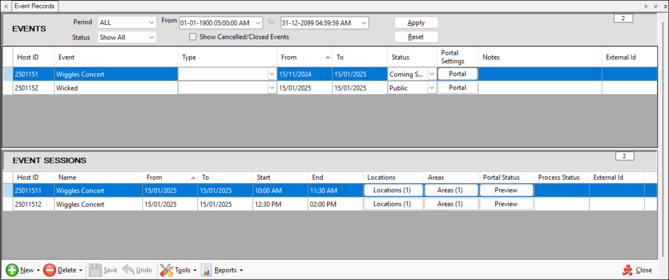
To access, select the Event Records menu option from the Events menu in Back Office. Used to configure Events/Sessions to support the managing and reporting of event related orders/sales as well as the export of Event Analysis related orders/sales data.
Sections ▲ ▼
Filters Section ▲ ▼

Used to limit the number of rows displayed in the grid section. Once all filters have been selected, select the Apply option to apply them. Otherwise, select the Reset option to clear all filters.
Events Section ▲ ▼
Grid Section
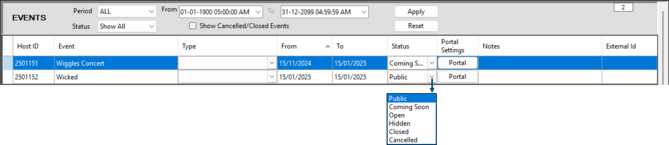
Displays a list of Events along with their Host ID, Event, Type, From/To dates, Status, Portal Settings, Notes and External ID.
Noteworthy
- Type - Select from the drop-down list of Event Types.
- Status - Select from the drop-down list one of the following:
- Public - This is the default setting.
- Coming Soon - Select to indicate that the Event has been flagged as an upcoming Event.
- Open - Select to indicate that the Event is open for Advance Day Orders (ADOs).
- Hidden - To be continued ...
- Cancelled - Select to indicate that the Event has been cancelled.
- Closed - Select to indicate that the Event has been closed.
Notes ...
The status selected here only has a bearing on Back Office functions and does NOT impact the Events Portal in any way.
- Portal Settings - Select to open the Event Portal settings screen to configure the settings.
- Notes - Select in any one of the cells opposite and Event to open the Notes screen and record notes relevant to an Event.
- External ID - Enter an External ID unique to the Event.
Notes ...
Rows displayed in the grid can be sorted by toggle selecting the column headings.
Event Sessions Section ▲ ▼

Grid Section
Displays a list of Sessions, associated with the Event selected above, along with their Host ID, Name, From/To dates, Start/End times, Locations, Areas, Portal Status and Process Status.
Noteworthy
- Locations - Select to open the Locations screen to view/select/unselect Locations associated with the selected Session.
- Areas - Select to open the Event Session screen which lists the Areas associated with the selected Session.
- Portal Status - Select to open the Event Portal Session tab to configure the settings for the Events Portal.
- External ID - Enter an External ID unique to the Event Session.
Footer Section ▲ ▼

- New - Select to from the drop-down list one of the following:
- Event - Select to open the New Event screen to add a new Event.
- Session - Select to open the New Event Session screen to add a new Session.
- Save/Undo - Select to save/undo changes.
- Delete - Select from the drop-down list one of the following:
- Event - Select to delete the selected Event.
- Event Session - Select to delete the selected Session.
- Tools - Select from the drop-down list one of the following:
- Create Purchase Requests
- Create Order Charges
- Import Events - Select one of the following:
- Navision (File) - Select to open File Explorer to select a CSV file to import.
- Ungerboeck (API) - Select to display the Ungerboeck Events Importer prompt to import Ungerboeck Events.
- Ungerboeck (JWT) - Select to display the Ungerboeck Events Importer prompt to import Ungerboeck Events.
- Notifications - Select to open the Notification Configuration screen to configure patron notifications for Events and Events Portal.
- Reports - Select from the drop-down list one of the following:
- Boxes
- Chefs Reports
- Suites
- Testing
- Edit - Select to open the Reports screen and edit reports and their filters/options.
- Close - Select to exit.
End of article ▲