Subjects ▲ ▼
About ▲ ▼
When Is It Used? ▲ ▼
It is used to manage Suppliers in Back Office.
Screens ▲ ▼
Clone to Location Based Suppliers ▲ ▼
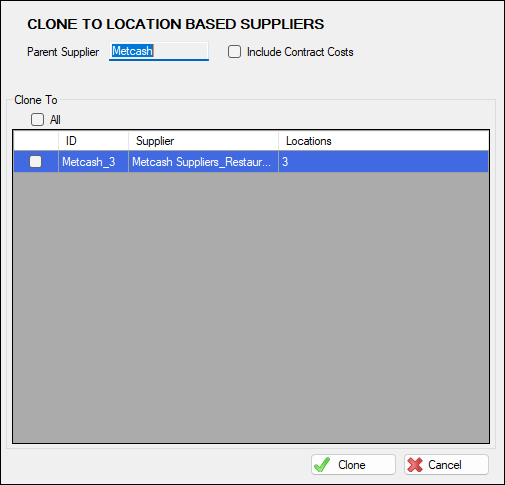
To access select the Clone option in the footer section of the Products tab. Used to select one or more Location Based Suppliers to which the selected Products will be cloned.
- Parent Supplier - Displays the selected Supplier
- Include Contact Costs - Select to ensure that Contract Costs are included when Cloning.
Lists all Location based Suppliers associated with the selected Parent Supplier, along with their ID, Name and Locations.
- All - Select to ensure all Suppliers listed in the grid are selected. Unselect to ensure all Suppliers listed in the grid are unselected.
- Clone - Select to clone.
- Cancel - Select to exit.
Supplier Edit Screen ▲ ▼
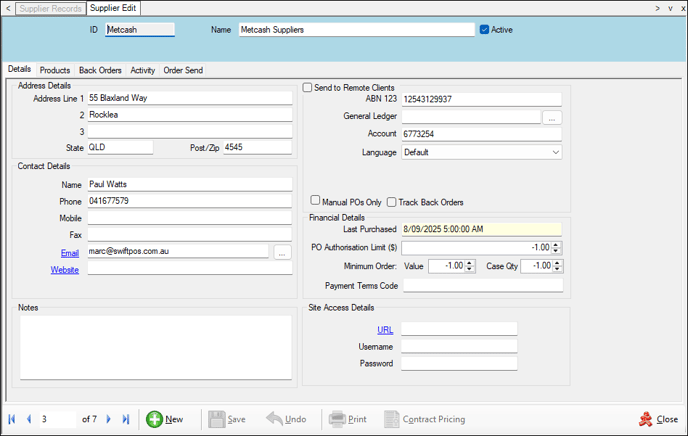
To access, select a Supplier listed in the Supplier Records screen and then select the Full Edit option. Used to manage/view the details of a selected Supplier.
![]()
- ID - Displays the selected Supplier's ID. When adding a new Supplier, enter a unique ID for the new Supplier. When editing the value displayed here CANNOT be changed. To change an existing Supplier's ID, refer HERE.
- Name - Displays/Edit the selected Supplier's Name.
- Active - Select to flag the Supplier as active. This is selected by default when adding a new Supplier.
Notes ...
Purchase Orders and Invoices can only be created for Suppliers that are flagged as Active.
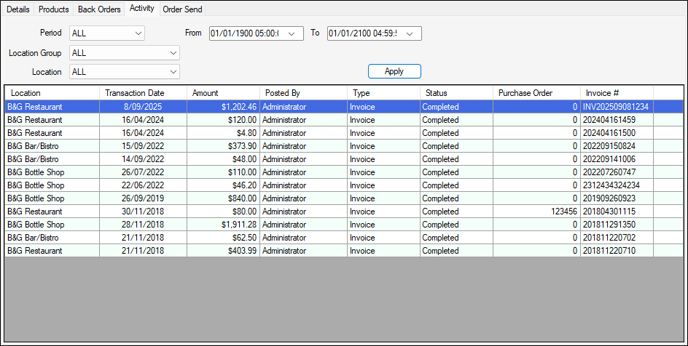
Used to view all recent activity for the selected Supplier.
Header Section
- The filters at the top of the screen can be used to limit the number of rows displayed in the grid. The filters include the following types:
- Date Range From/To - The filter fields of this type are Period drop-down list and From/To Dates.
- Drop-Down Lists - The filter fields of this type are Period, Location Group and Location.
- Full/Partial Texts - The filter fields of this type are ID, Name, ABN and Account.
- The filters at the top of the screen continued ...
- Search Screens - The filter fields of this type are Location
Notes ...
This column will only be visible, when the Enable Location Based Suppliers option is selected.
Grid Section
Lists the Activity for the selected Supplier, along with the Location, Transaction Date, Amount, Posted By, Type, Status , Purchase Order and Invoice #.
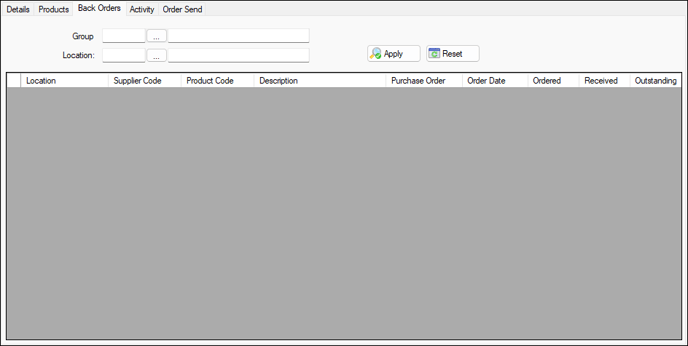
Used to view all current Back Orders for the selected Supplier.
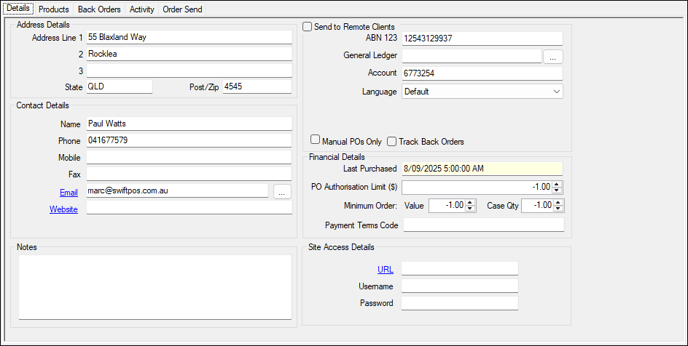
Used to edit/view all the details specific to the selected Supplier.
- Address Details - Enter the Supplier's address details in the fields provided.
- Contact Details - Enter the Supplier's contact details in the fields provided.
Notes ...
From Swiftpos v10.75+ onwards, multiple email addresses can now be associated with a Supplier.
- Notes - Displays/Enter any notes relevant to the selected Supplier that may be of interest in the future.
Send to Remote Clients Section ▲ ▼
- ABN - Enter the Supplier's ABN.
- General Ledger - Used for the GL Export of Supplier Information.
- Account - Enter the Account/Customer No assigned by the Supplier.
This is generally used in electronic invoices and therefore it is important to ensure this field is populated as some imports of electronic imports require this field. Also, in the case of Foodbuy this field may display multiple values separated by a semicolon (;). For more information HERE
- Language - Select the appropriate language from the drop-down list to ensure the description of the Product is also displayed in the language selected. For example:

- MYOB AR Card ID - Displays/Enter the Card ID assigned to the same Supplier in MYOB AccountRight.
- Rebate Account - Select to open the Search Accounts screen to select an Account that has been specifically created for Rebates pertaining to the selected Supplier. Supplier Rebate Accounts are used to facilitate the tracking of Rebates accrued (from sales) and paid (by Suppliers). Account related Product Rebates are configured HERE and Rebate PLUs are assigned to Product Groups HERE. Sales of Products that have a rebate applicable will generate a Rebate transaction that will result in a charge to a Supplier Rebate Account specified here. Rebates will ONLY apply to sales made via the Back Office Basic Invoicing screen, and NOT when sold via a Swiftpos Touch terminal. When payments of Rebates are received from a Supplier, these can then be allocated/processed as per the normal Process Payments screen.
- Manual POs Only - Select to ensure the Automatic Orders feature will not be available for this Supplier.
This option MUST BE selected to ensure the workflow of PO Authorisations functions correctly for Manual POs. See also Clerk Authorisation limits and Supplier PO Authorisation Limit. When the use of Automatic Orders is appropriate for the selected Supplier, then ensure this option is NOT selected.
- Track Back Orders - Select to enable the tracking of back orders.
- Send To Remote Clients - When enabled, this will add the Supplier to the Generic Price Book.
- Last Purchased - Displays the date/time of the Last Purchase made from this Supplier.
- Payment Terms Code - Enter the code that determines the Payment Terms applicable.
Notes ...
This will only be enabled if the site is registered for either MYOB Greentree or Oracle Financials.
- PO Authorisation Limit ($) - Displays/Enter the maximum value limit for which NO authorisation is required. If a Purchase Order is authorised that exceeds the limit, then authorisation will be required from those Clerks/Staff Members that have been assigned to the Email Group set HERE.
- Minimum Order - Displays the values set for the following:
- Value - Displays/Enter the minimum value for an Order.
Notes ...
If an Order does not meet the minimum Value set here, the Order will not be sent. It will be flagged in the Purchase Order List screen. The Order will need to be edited, authorised and manually sent.
- Minimum Order continued ...
- Case Qty - Displays/Enter the minimum case quantity for an Order.
Notes ...
- If an Order does not meet the minimum Case Qty set here, the Order will not be sent. It will be flagged in the Purchase Order List screen. The Order will need to be edited, authorised and manually sent.
Site Access Details Section ▲ ▼
- URL - Displays/Enter the Supplier's website address/URL.
- Username/Password - Displays/Enter the login username/password to the Supplier's website.
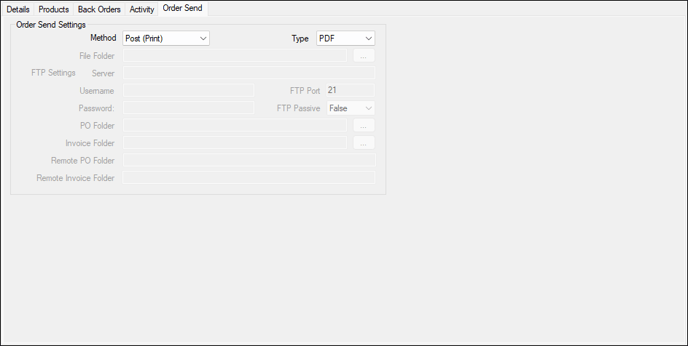
Used to configure the settings for the Automatic Orders feature.
- Method - Select from the drop-down list one of the available options.
- Type - Select from the drop-down list one of the available options.
- File Folder - Displays/Select the folder path to which the document will be saved.
- FTP Settings - Displays/Enter the required FTP settings below to enable the FTPing of documents. Note :
- FTP Settings continued ...
- Server
- Username/Password
- FTP Port
- FTP Passive
- PO Folder
- Invoice Folder - Select to open the Browse For Folder prompt to locate and select a folder in which the imported invoices will be placed. Automatic importing of invoices is done via the Auto Invoice Import interface in the Service Monitor. Also, the Email Server Account Settings and Service Alert Account Settings will need to be configured in Global Preferences to support the Auto Invoice Import interface. Select the Email alert options Errors, Failure Audits and Warnings to ensure that email notifications are sent for any invoices that cannot be imported.
- Remote PO Folder
- Remote Invoice Folder
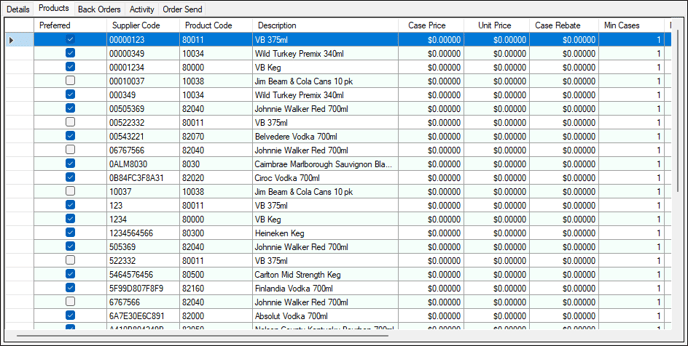
Used to list all Products that are currently assigned to the selected Supplier. Removing Products from the list can only be achieved via the Product Full Edit > Suppliers option. Adding Products listed in this screen can be done either by selecting the New option or via the Product Supplier Records screen.
![]()
- New - Select to add a new Supplier.
- Clone - Select to open the Clone to Location Based Suppliers screen and clone the Products displayed in the grid to one or more Suppliers.
Notes ...
This option is only enabled when the Products tab is selected and the Enable Location Based Suppliers option is selected.
- Save - Select to save changes.
- Undo - Select to undo changes made.
- Print - Select to generate the Supplier Inventory (SSFE008) report, which reports on all the Products that are currently assigned to the selected Supplier.
- Contract Pricing - Select to open the Contract Pricing screen to manage Pricing Contacts associated with the Product currently selected in the grid.
- Preview - Select from the drop-down list to preview either the Invoice or Order associated with the selected row in the grid.
- Close - Select to exit.
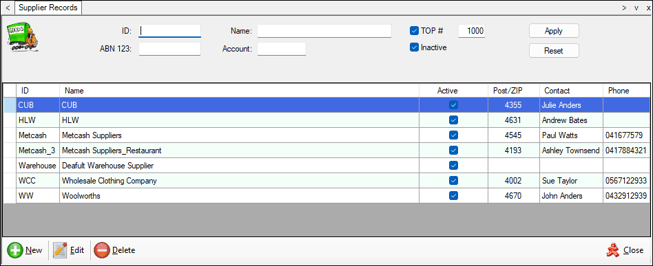
Supplier Records Screen ▲ ▼
To access select the Supplier Records option from the Suppliers menu in Back Office. Used to manage/view Swiftpos Suppliers.
Notes ...
In the screenshot above, the Supplier with ID Metcash_3 is an example of a Location based Supplier. Metcash being the Parent Supplier.
- The filters at the top of the screen can be used to limit the number of rows displayed in the grid. The filters include the following types:
- Check Boxes - The filter fields of this type are Inactive.
- Drop-Down Lists - The filter fields of this type are Type. This field will only be visible when the Enable Location Based Suppliers option is selected.
- Full/Partial Texts - The filter fields of this type are ID, Name, ABN and Account. The label ABN may vary depending on the ACN/ABN/Company No setting.
- Search Screens - The filter fields of this type are Location. This column will only be visible, when the Enable Location Based Suppliers option is selected.
- Top #
- Apply
- Reset
Lists the Supplier currently available in Swiftpos, along with their #, Name, Location/s, Active status, Post/ZIP, Contact and Phone.
Noteworthy
- Location/s - Displays the Locations to which the Supplier is assigned. A value in this column indicates the Supplier is a Location based Supplier.
Notes ...
This column will only be visible, when the Enable Location Based Suppliers option is selected. A Parent Supplier can be identified as one that does NOT have a value in this column.
- Phone - Displays the contact number.
Notes ...
The data displayed in the grid cannot be edit in this screen and can only be edited in the Supplier Full Edit screen.
- New - Select from the drop-down list one of the available options:
- New Parent Supplier - Select to add a Parent Supplier.
Notes ...
For this feature to be visible, the Enable Location Based Suppliers option must be selected. A Parent Supplier can be identified as one that does not have a value in the Location/s column.
- New continued ...
- New Location Supplier - Select to add a Location based Supplier. Once added a Location Supplier will inherit most of the details from the Master Supplier, with the exception of Location specific details.
Notes ...
For this feature to be visible, the Enable Location Based Suppliers option must be selected. A Location Supplier can only be added if a Parent Supplier is selected in the grid.
- Full Edit - Select to edit the selected Supplier.
- Delete - Select to delete the selected Supplier.
Notes ...
Suppliers can only be deleted when they meet specific criteria.
- Close - Select to exit.
End of article ▲