Subjects ▲ ▼
About ▲ ▼
What Is It? ▲ ▼
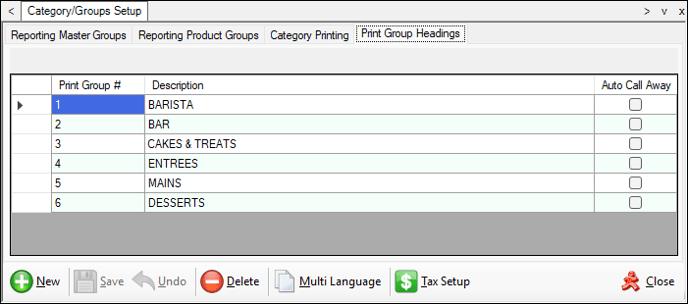
Print Groups are usually created to group Items/Products together to ensure they are displayed/printed together as a group. For example, the typical Print Group Headings created for a Swiftpos install could be:
- BARISTA
- BAR
- CAKES & TREATS
- ENTREES
- MAINS
- DESSERTS
What To Consider? ▲ ▼
- Item/Products are associated with a Print Group depending on the Category they are assigned to. Refer HERE for more information.
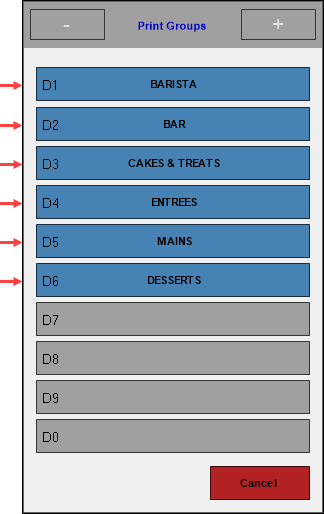
- The order in which the Print Groups Headings are listed in the Print Groups screen when the Call Away feature is used, will depend on the Print Group # they are allocated in the Print Groups Headings screen below. The Print Groups are listed in order in ascending order of the Print Group #. Refer HERE for examples.
Examples? ▲ ▼
The following provide examples of Print Groups being displayed/printed in Swiftpos when used in conjunction with:
Call Aways
Kitchen Dockets

KVS

How To? ▲ ▼
How To GET STARTED? ▲ ▼
In Back Office:
- Create the Print Groups. Do as follows:
- Expand the Products menu.
- Select the Print Groups Headings tab in the Category/Groups Setup screen to display the Print Group Heading tab.
- Select the New option in the footer section to add a row to the grid with the Print Group # and Description fields automatically filled.
- Change the description in the Description field to reflect the name of the Print Group being added. Examples are, BARISTA, BAR, CAKES & TREATS, ENTREES, MAINS and DESSERTS.
- If required, select the Auto Call Away option to ensure it is enabled (ticked). Refer HERE for more information.
- Select the Save option to save the changes.
- Repeat the above for as many Print Groups that are required to be added.
- Select the Close option to exit the screen.
- Once all Print Groups have been created, it will be necessary to ensure they are associated with Swiftpos Categories where appropriate. Refer HERE for more information.
Screens ▲ ▼
Print Group Headings Screen ▲ ▼
To access, select the Print Groups Headings tab in the Category/Groups Setup screen, that is accessed by selecting the Category/Groups Setup option in the Products menu in Back Office. Used to create and maintain the grouping of Items/Products for the purposes of displaying/printing on KVS screens and on Kitchen printers. It is also used for determining the Group sales information printed on the Swiftpos Touch terminal report. This is not to be confused with Product Groups. These are used in Swiftpos to report on sales.
Grid Section
- Print Group # - Displays/Enter the identification number of the Print Group.
Notes ...
The number determines the order in which the items will be displayed at KVS and printed at Kitchen/Order printers. Items will be printed under the Print Group Headings in ascending order of the Print Group number. To change the display/printing order, change the number assigned to a Print Group heading.
- Description - Displays/Enter the description of the Print Group that will be displayed on KVS and printed on Kitchen/Order printers. Examples are, BARISTA, BAR, CAKES & TREATS, ENTREES, MAINS and DESSERTS.
- Auto Call Away - Select to ensure the selected Print Group is enabled as a Auto Call Away Print Group. This means, that when an Item/Product, associated with the Print Group, is ordered, it will be called away automatically and will not require Print Group to be manually called away. Refer HERE for more information. Item/Products are associated with a Print Group depending on the Category they are assigned to.
Footer Section
- New - Select to add a new Print Group.
- Save - Select to save changes.
- Undo - Select to undo changes made.
- Delete - Select to delete the selected Print Group.
- Multi Language - Select to set alternate language descriptions for the selected Print Group.
- Close - Select to exit.
End of article ▲